INODE-AI
Overview
In a nutshell, InodeAI is an AI marketplace that provides containerized models to both enterprises and individuals alike. Data Scientists have the opportunity to market their models in our extensive catalog, and get paid for their efforts should a buyer decide to purchase them. Buyers would stand to benefit from utilizing a containerized ready-made, low-code solution that could integrate well in their infrastructure.
Because the buyer will be using these models in their infrastructure, we need to make sure that the models that sellers are provided are vetted and go through an appropriate approval process. This process requires some small updates to your code, and a little back and forth on documentation…sellers might need an in-depth understanding of our build process and how to test and troubleshoot their models.
Buyers and Sellers are not the only ones that we support at InodeAI! Should you wish a custom solution for your needs, you need only submit a ai project marketplace request!
AI Project Marketplace Request Approval Process
InodeAI offers a powerful means for companies and individuals to request AI Solutions to particular problems. By leveraging our platform, you will be reaching out to our sellers who will compete to fulfill your needs. As you will be reaching out to potentially hundreds of sellers, you might need to ensure that your request is well documented. You must know how to clearly define the problem you wish to solve, know your budget to solve this problem, and provide as many details as is necessary to solve your particular problem.
If your request is not well documented, not only will people not submit models to your request, but those few models that make it might be far off from your desired goal. Providing test data, or at least the schema of data, will help sellers tremendously as they work to fulfill your needs.
In general, the ai project marketplace request approval flow might proceed as follow.

AI Project Marketplace Fulfillment Process
As an independent seller, you may always submit models in an attempt to fulfill a AI Project Marketplace Request. If your model is accepted, you might stand to make some money off of it. That being said, the approval process for said models is very much dependent on the approval of the individual creating the AI Project Marketplace Request. If they deem your model sufficient, they will purchase a certain number of credits from InodeAI (relevant to their budget) and purchase your model.
They are under no obligation to accept any particular model, for a variety of reasons and they might or might not inform you of said reasons.
As such, it might be necessary that the models you submit are qualified and competitive. They must be well documented, performant, accurate, and fulfill whatever needs the AI Project Marketplace Requestor might have specified. Even in this case, their requirements might change, so it might be worth keeping up-to-date with the ai project marketplace request.
Currently, the ai project marketplace fulfillment process might flow as follows…


Model Approval Process
While building models for inodeAi, one must always remember that buyers are trusting you (and, in extension, us) to provide a solution that is reliable, performant, well documented, and secure. In order to achieve some sense of this, models must go through a process to get approved and listed in our catalog:
1. Models must be well documented. Note: If you want an example of a well documented model, download the documentation from this one HERE
- What’s the input and output ?
- What are the use cases of your model ?
- What are the limitations of your model ?
2. Models must be performant and reliable.
- How accurate is your model ?
- How precise is your model ?
- What are the limitations of your model ?
3. Models must be as secure as possible..
- Vulnerabilities will be scanned for and should there be vulnerabilities of a critical level, they will not be accepted.
- So try to make sure that the model is using up-to-date libraries, if at all possible. ?

Purchasing a Model
Numerous models are available on Inode AI's marketplace for purchase. Simply use the marketplace as you would any other ecommerce site. Browse and purchase to your heart's content!
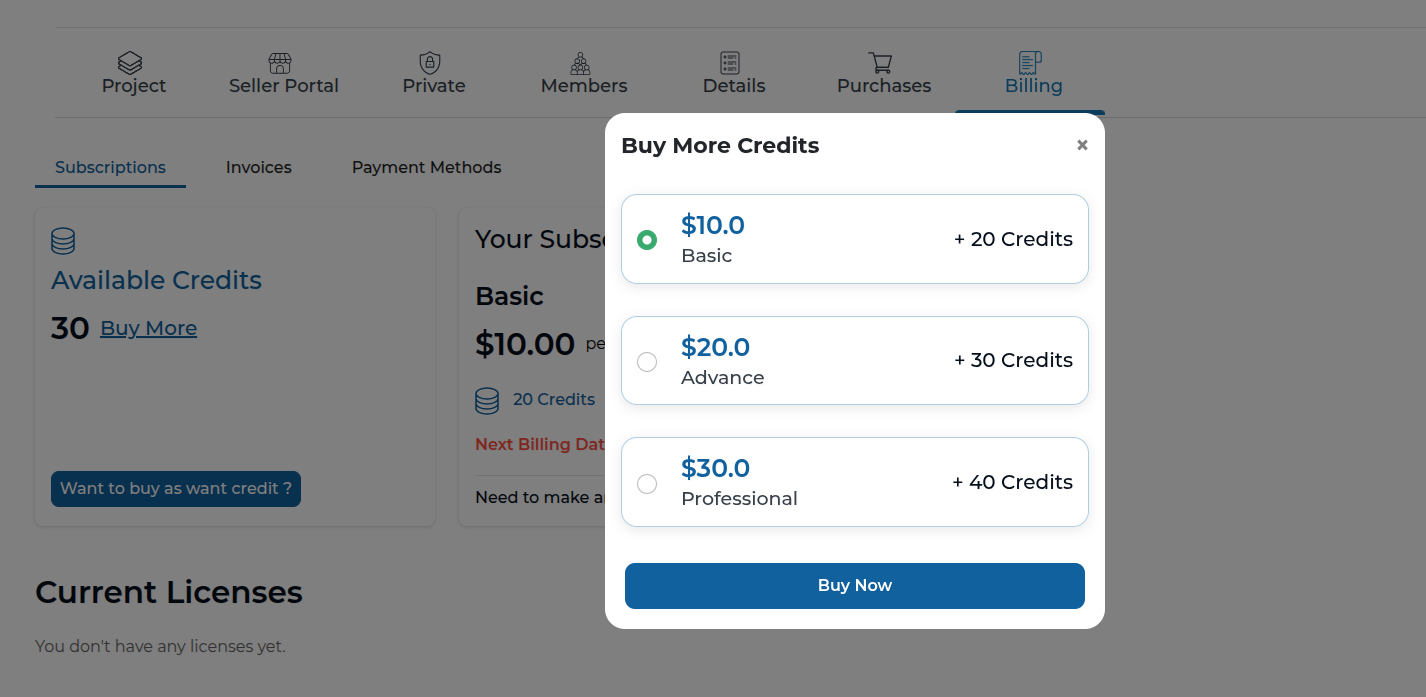
Credits
Many models in the marketplace require credits to purchase. Once you've purchased a model, you continue to recieve access to it as long as you continue to subscribe to the model (i.e. your credits remain allocated towards the model).
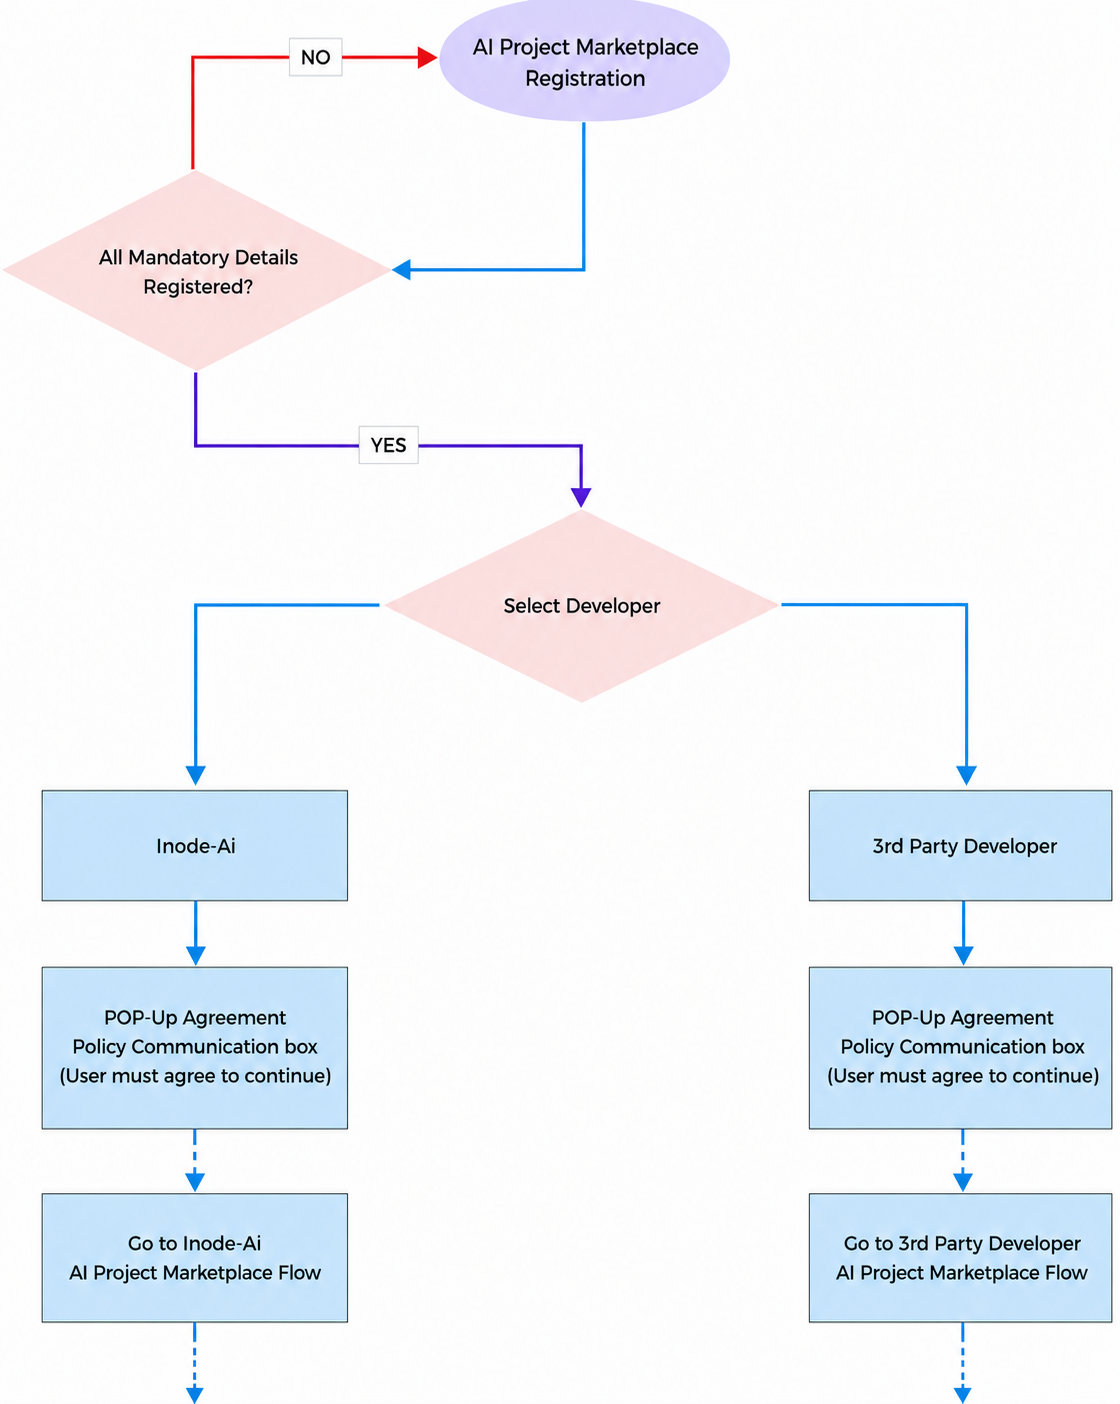
AI Project Marketplace Registration
- Only registered users can request a ai project marketplace.
- Users must complete their profile information, including government ID, personal photo, and valid phone number, before requesting a ai project marketplace.
- Users can choose between monthly and one-time payment options for ai project marketplace.
- If no third-party developer responds to a created ai project marketplace, it will be automatically deleted within 30 days
- Upon registering a ai project marketplace, users will receive an email notification containing their ai project marketplace summary and ID number.
- After registering a ai project marketplace and selecting a third-party developer, an automatic email notification with the ai project marketplace summary and a link to the ai project marketplace will be sent to all developers who have accepted to receive ai project marketplace from end users.
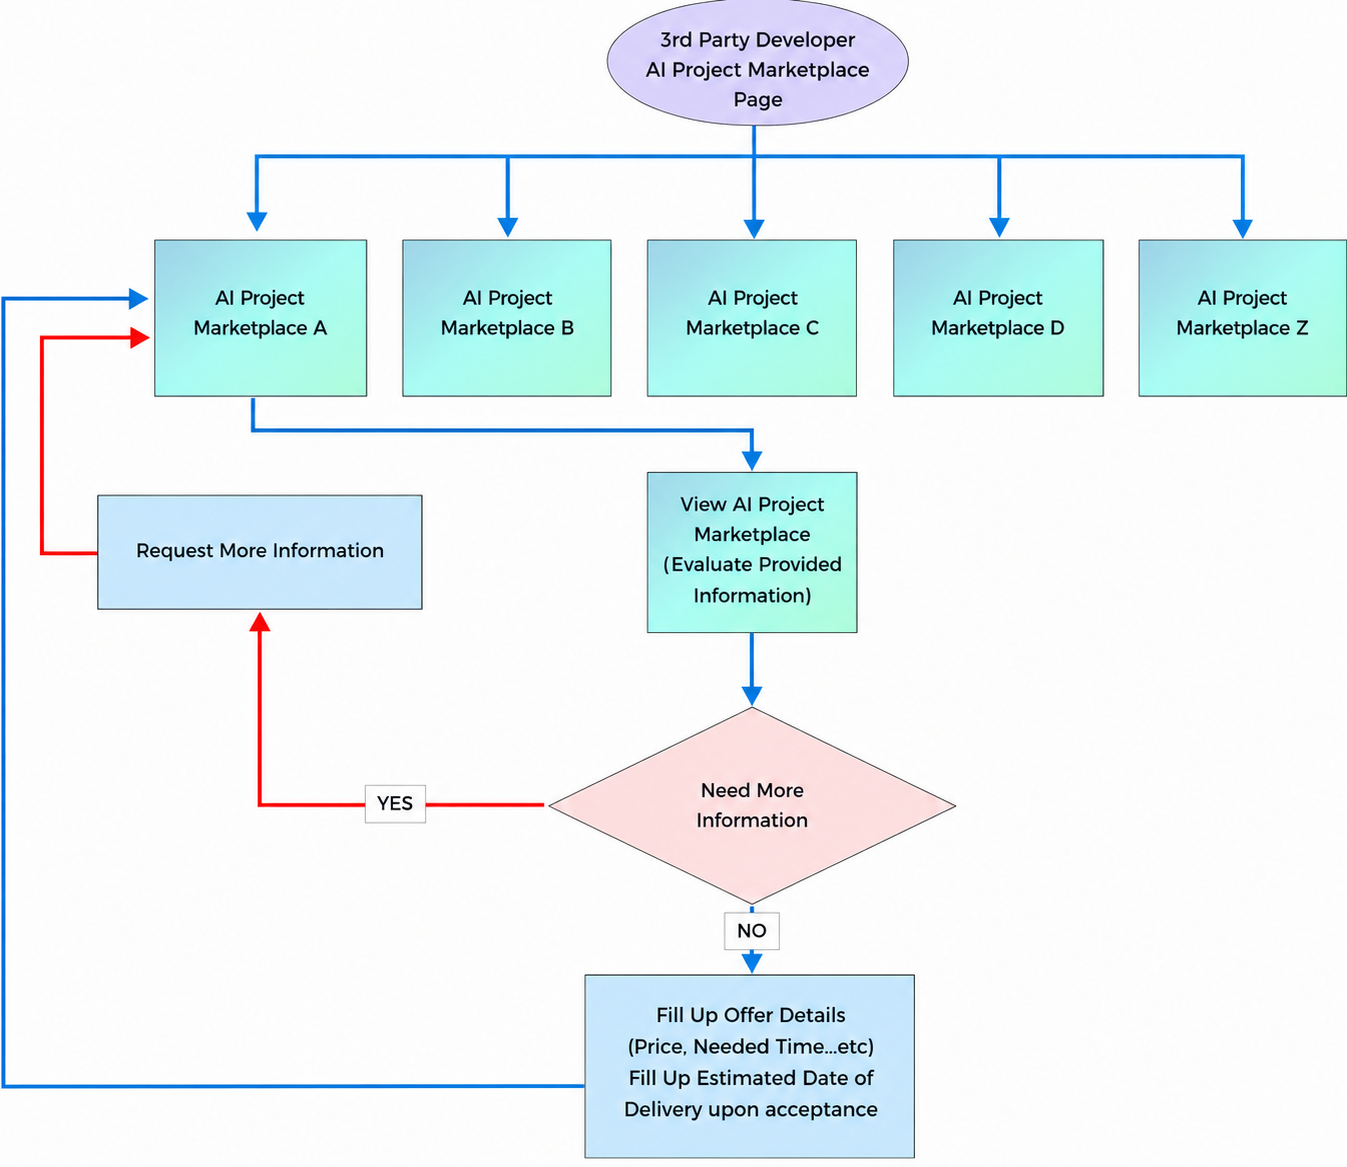
3rd Party Developer
- Third-party developers receive automatic email notifications for each registered ai project marketplace.
- Only third-party developers who have opted in to receive ai project marketplace requests will receive email notifications for ai project marketplace registrations.
- Third-party developers cannot view the contact information of ai project marketplace requesters until they respond with an offer, and it is accepted.
- Third-party developers can view and assess all ai project marketplace that are under the status "request."
- Third-party developers can request more information or send offer details in response to end user ai project marketplace.
- Automatic email notifications must be sent to end users or developers if there is a response needed for information or questions.
- Third-party developers must set a due date when sending an offer. (If the user accepts, the due date cannot be changed by the developer.)
- Automatic notification emails must be sent to developers and end users as reminders if the due date has passed and the status is still not "complete."
- Automatic notification emails must be sent to developers and end users as reminders if the due date has passed and the status is still not "complete."
- If the end user accepts the developer's offer, an automatic notification email is sent to the developer. At that time, the developer can view the end user's email. (Only the end user's email address will appear for the developer.)
Inode Developer Side
- The same end-to-end communication process applies for requesting more information or asking questions as the third-party developer applies.
- Agreement contract will be attached in ai project marketplace communication if user accepted the offer to be signed.
- Online payment link will be sent to end user thru communication and email after offer accepted.
- Automatic notification emails will be received if the end user accepts the offer, completes the online payment, or rejects our offer.
- The ai project marketplace status will change to "In-progress" once the user completes the online payment.
- Only the end user can change the due date to a future date.
- Only the end user can change the ai project marketplace status to "complete."
- The end user will evaluate the developer (Inode Technology FZE) upon project completion.

End User AI Project Marketplace Side
- End user will be able to view provided contract from 3rd party developers only if received offer is accepted.
- Only the organization name, account number, and rating of the third-party developer can appear to end user if developers respond with "Need more information" or "Offer."
- AI Project Marketplace that receive no response for 30 days will be removed, and their status changed to "inactive" to reduce the number of ai project marketplace in the Developer Marketplace.
- End user must change the ai project marketplace status to "Complete" when it is completed.
- Only end user can change the ai project marketplace due date, and only to a future date, after accepting an offer.
- End user must agree to the User Agreement in a pop-up window when selecting a third-party developer for their ai project marketplace.
- End user must rate the third-party developer upon job completion.
- After the end user accepts a developer's offer, no edits, modifications, changes, or deletions can be allowed to the ai project marketplace.
- When end user accepts an offer, an auto-confirmation email is sent to the developer ("Offer Accepted").
- The ai project marketplace will disappear from the AI Project Marketplace Marketplace when end user accepts an offer from a third- party developer.
- The project status changes to "Development In-progress" when end user accepts an offer.
- If end user rejects an offer, an auto-notification email is sent to the developer, and the status for the developer shows "Offer rejected."

Mandatory Info
- AI Project Marketplace Title
- Description of AI Project Marketplace.
- One Time or Monthly Budget.
- Summary.
- Problem Description in details.
- Best Result looking for.
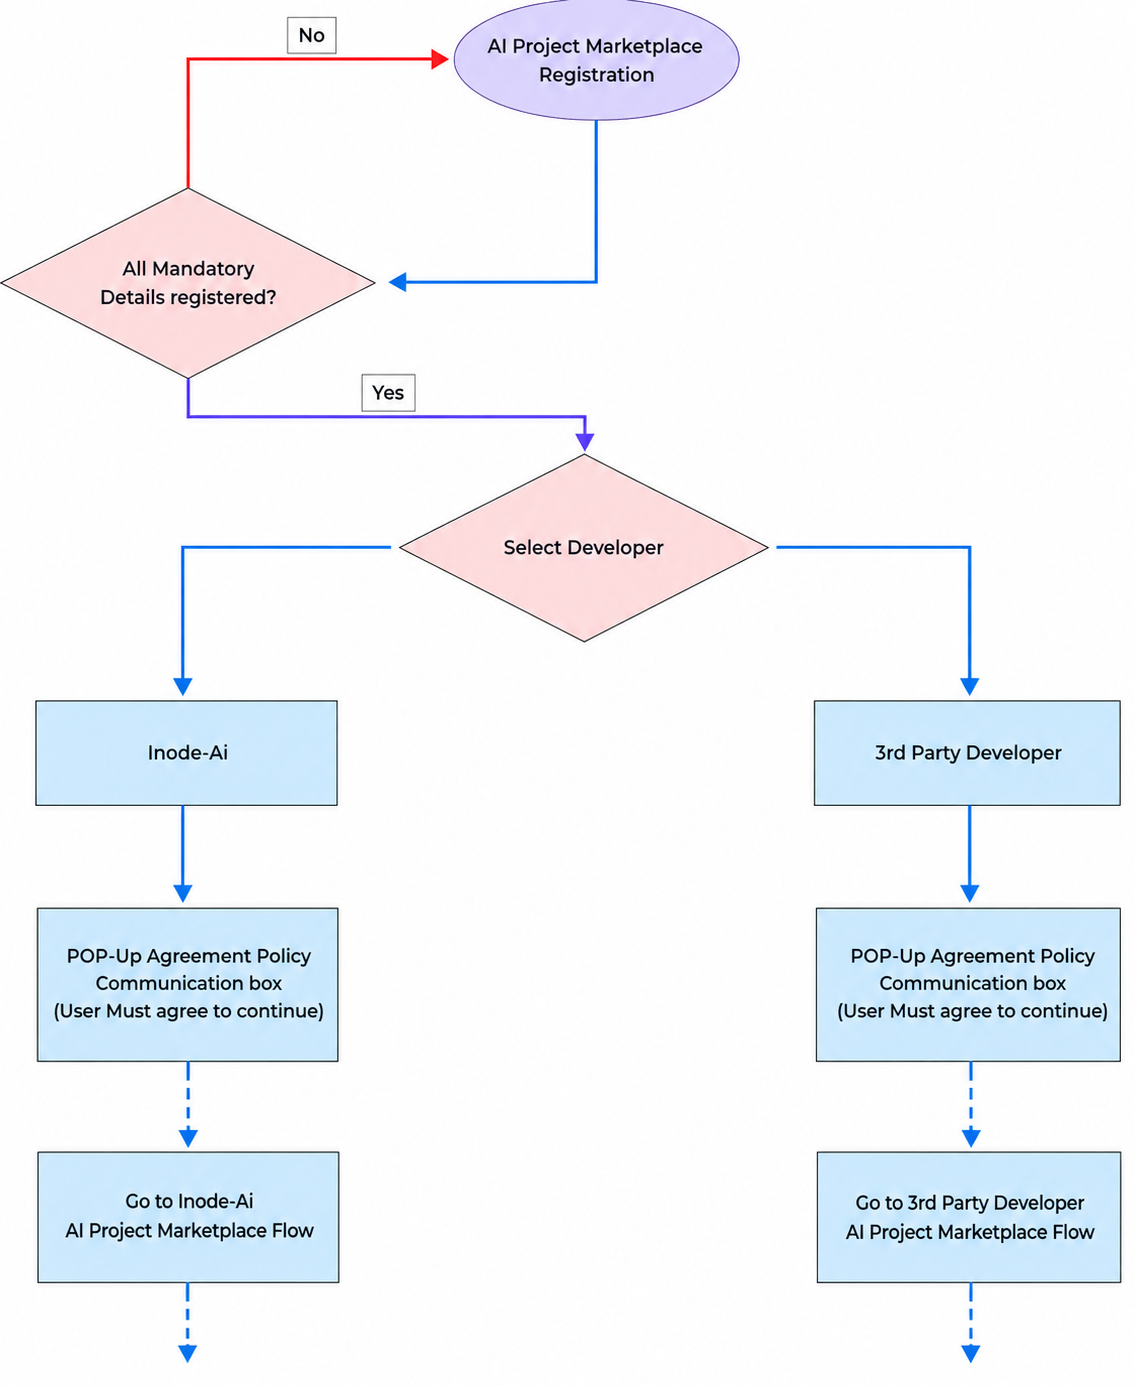
Inode-Ai POP Agreement
- You acknowledge and agree that upon selecting Inode Technology FZE (inode-ai) to undertake your ai project marketplace project, you are obligated to remit 50% of the total project cost as an initial payment following receipt and acceptance of the offer.
- You consent to the terms stipulating that any offer extended by Inode Technology FZE (inode-ai) pertaining to your ai project marketplace is valid for a duration of three business days only. Following the expiration of this period, you are required to initiate a new ai project marketplace registration process.
- The payment link for 50% of the project cost will be dispatched to you within 24 hours subsequent to your acceptance of the offer furnished by Inode Technology FZE (inode-ai).
- You acknowledge and agree that you will promptly complete the payment within 24 hours upon receipt of the online payment link. Failure to do so will result in the expiration of the link.
- Inode Technology FZE (inode-ai) will refrain from commencing work on your ai project marketplace in the event of an unsuccessful or delayed payment transaction.
- In the event of an overload, we reserve the right to engage a third-party developer. You acknowledge and agree that you are prohibited from requesting the personal contact details of the developer or contacting the developer directly without the supervision of an INODE-AI Project Manager.
- We will arrange regular meetings to review the progress of your project, during which our developers may seek clarification and feedback from you. Your participation in these meetings is crucial, and they may be rescheduled depending on the availability of both the developer and the project manager.
- If any additional requests arise from you during the development period, they must be submitted in written form via email. We will assess your request and provide feedback regarding its feasibility, the time required for implementation, and any additional costs associated with it.
- You acknowledge that we are not liable for any data loss or unauthorized disclosure of trade secrets or personal information unless such information is shared through a secure Google Drive or shared folder with read-only access.
- Prior to receiving the final product, you will be invited to a demonstration meeting to view your project. To download the project, you must settle the remaining 50% of the payment if you have opted for 100% ownership (One-time project).
- You agree that if you have opted for a monthly subscription ai project marketplace (Model or API), you are obligated to maintain the subscription for a minimum of 12 months. Failure to adhere to this requirement will result in your model being listed for sale on our category marketplace.
- If you have not requested 100% ownership, you acknowledge that Inode Technology FZE (inode-ai) retains ownership of your completed project/model and considers it an asset.
- Inode Technology FZE (inode-ai) reserves the right to utilize it to generate revenue by offering subscriptions to users on our marketplace.
3rd Party Developer POP Agreement
- By choosing to hire a 3rd Party Developer to work on your ai project marketplace, you acknowledge that Inode Technology FZE (inode-ai) shall not be held liable for any losses that may arise due to your selection.
- Inode Technology FZE (inode-ai) will not participate in any communication or agreement that you may enter into with the 3rd Party Developer you have chosen to work on your AI Project Marketplace.
- The 3rd Party Developers are independent freelancers and are neither employees nor partners of Inode Technology FZE (inode-ai). They are available to assist you in completing your ai project marketplace.
- You acknowledge and agree that Inode Technology FZE (inode-ai) cannot be held liable or responsible for any loss incurred by you, in any form, including but not limited to financial loss, trade secret leaks, personal information/data leaks, emotional damage, or physical injury, arising from your use of our platform or selection of a 3rd Party developer to work on your ai project marketplace.
- We strongly advise you to engage in any business transactions with 3rd party developers only after signing a contract agreement that includes your identity and the identity of the 3rd party developer. This ensures clarity and accountability in the event of any disputes or issues that may arise during the course of your engagement.
- In the event of any dispute arising between you and the 3rd Party developer,Inode Technology FZE (inode-ai) will have limited responsibility, primarily to facilitate communication with the developer and attempt to resolve the conflict or dispute amicably.
- Inode Technology FZE (inode-ai)'s response to any confirmed fraud or misconduct by a third-party developer will be limited to suspending their inode-ai user accounts and blocking their IP address to prevent them from accessing our platform in the future.
- Your personal information, specifically your email address, will only be accessible to the developer whose offer you have accepted for the ai project marketplace you have registered.
- By clicking "agree," you are authorizing Inode Technology FZE (inode-ai) to disclose your email address to the third-party developer whose offer you have accepted. In return, you will be able to view the email address of the developer once you accept their offer.
Build Configuration
Prior to the Build
What to you know prior to creating your project
-
What to know prior to creating your project:
- If your code works locally, it doesn’t necessarily mean that it will work when it gets put into hosted os. You must create your project in such a way that it must be able to run on a linux-based container. This is currently a container derived from centos.
- Handling multi-file input/output is a bit tricky at this time. While possible, have single file input/output is preferred.
- Currently, our supported languages are Python 3.5 - 3.11, Python 2.7 (recommend not using), and R 4.2
-
Coding your Hello Universe Project
-
Regardless of how you create your model...
- you must take care to carefully list your dependencies in a requirements.txt file or using renv
- you must have a single entry script that takes into account, at minimum, a path to an input file and a path to an output file. (see Input/Output Handling)
-
Regardless of how you create your model...
Build Configuration File
You can control additional build options for your project by including a "inode-ai-build.json" file in your uploaded archive. This file should be in standard json format. Be sure it's located at the root level of the project:
Project_to_Upload/ |--> requirements.txt
Example File
The following example installs required or dependent library as a dependency. It
                  "numpy",
                  "pandas",
                  "matplotlib",
                  "open-csv",
                  "sci-py",
                  "scikit-learn",
                  "scipy",
                  "six",
                  "contourpy",
InputSchema & OutputSchema - An list which contains schema setting
objects that will auto-populate
the container upload form. The object must contain the following:
-
DataType- "datatype" is a text string corresponding to an item in the datatype enummerated list in the container api, to indicate the type of data the path represents. This value can be one of types:- "string"
- "number"
- "date"
- "boolean"
-
Optional- A boolean value to indicate whether the path is optional. -
Path- A schema path as defined in Schema Paths.
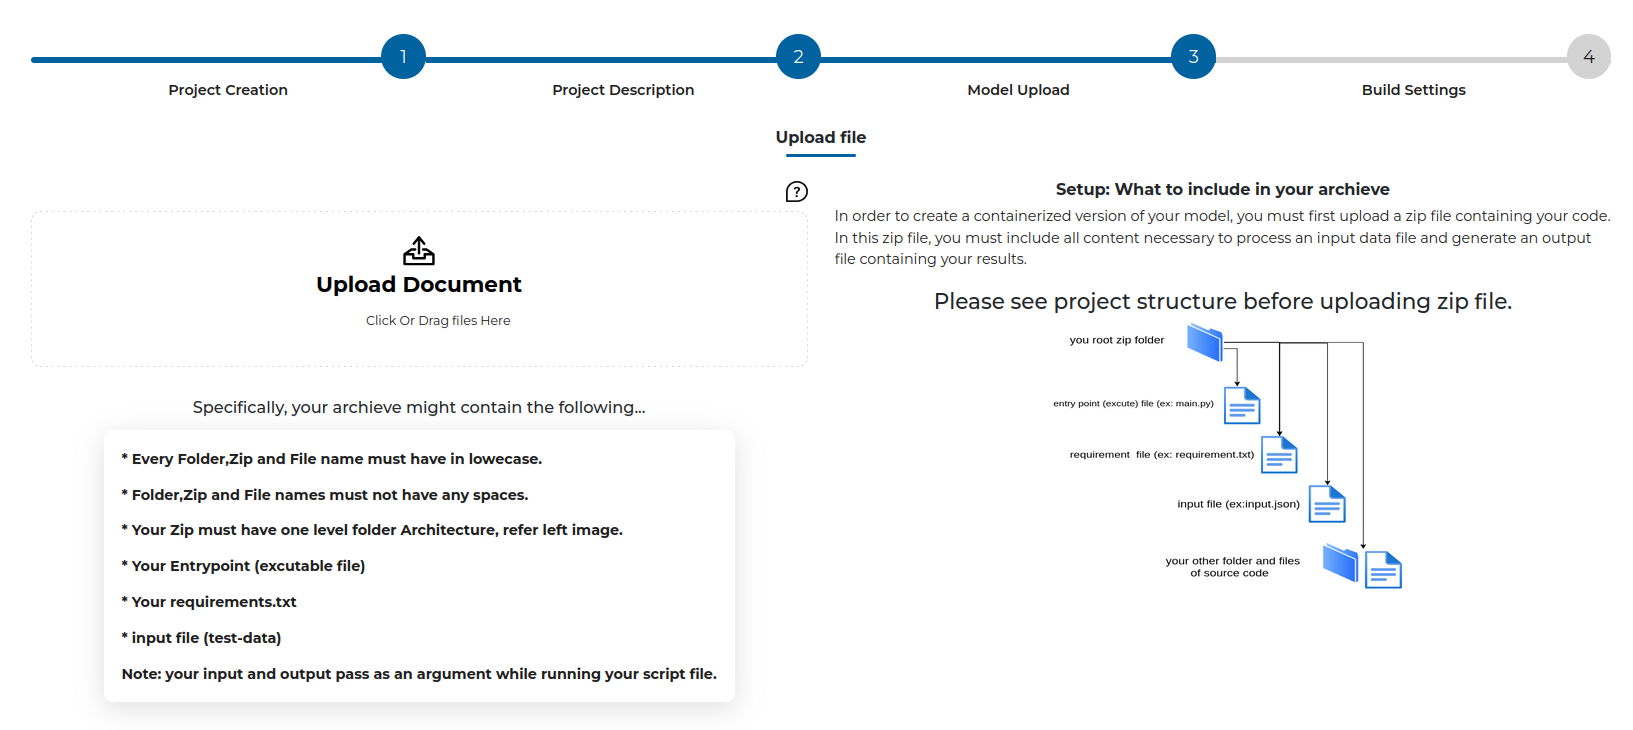
Uploading your Model
- All you need to do is compress (zip/tar/etc) your code. You need not upload/package and dependencies.
- Once you choose your zipped model, just click this will upload your model.
- All you need to do is compress (zip/tar/etc) your code. You need not upload/package and dependencies.
- Once you choose your zipped model, just click this will upload your model.
- A progress bar will appear, indicating progress of your upload.
- NOTE: your model need not be a .zip. It could be a .tar, a GZip, etc.
- NOTE: it might take a while for your model to load, especially if your model is large . Please be patient and wait for the upload to complete.
Building Python Projects

A. Select your version of Python
- Currently InodeAI only supports versions 3.11 and 3.10
B. Select your entrypoint script
C. Select your requirements.txt file
- Say if your script is to run like python entrypoint.py test_file.csv result.csv then you would simply input:E. Select the type of data for input/output
F. Specify schema paths for data
G. Specify data type for data
H. Review Input/Output Schema
Building R Projects

A. Select your entrypoint script
B. Select your requirements.txt script
C. Select the type of data for input/output
E. Select the type of data for input/output
F. Review Input/Output Schema
Dependency Management
While we have plans for expanding dependency management support, currently we only manage dependencies through requirements.txt files (Python) or renv (R).
There is no need to install/package your dependencies prior to the upload; we will install them in the container during our build process.
Directory Structure
There are numerous ways of structuring your projects, and we try our best not to dictate to you how to do so. As such, you can have as many nested directories as you like (but being reasonable is always a nice thing ;-)). We should be able to detect both your entry script and the file used for managing dependencies; whether this be a requirements.txt file (in the case of coding a Python project) or renv/ (in the case of R projects).
How should your model handle input and output?
To get your model to handle input and output, your entry script must be executed with (at minimum) two arguments representing paths to input and output files. Input files cannot be assumed to be static files existing in your model, as the end user of your container will need to supply their own input files.
Getting Input/Output recognized when NOT using the inode-ai library.
One way of handling input and output is to handle an input file path as supplied at the CLI directly. Below is a working example (an example of the pythagorean theorem) of this use case:
                  1. import numpy as np
                  2. import pandas as pd
                  3. import math
                  4. import os
                  5. import warnings
                  6. from pathlib import Path, PurePath
                  7. import sys
                  8.
                  9.
                  10. warnings.filterwarnings("ignore")
                  11.
                  12.
                  13. if (len(sys.argv) <= 1):
                    14. sys.stderr.write("No file specified on
                      command line")
                    15. sys.exit(2)
                    16.
                    17. datafile = Path(sys.argv[1])
                    18. if (not datafile.is_file()):
                    19. sys.stderr.write("Input file not
                      found")
                    20. sys.exit(2)
                    21.
                    22. dataPath = str(datafile.resolve())
                    23.
                    24.
                    25. if (len(sys.argv) <= 2):
                      26. sys.stderr.write("No output file
                        specified on command line")
                      27. sys.exit(3)
                      28.
                      29. outfile = Path(sys.argv[2])
                      30. print(outfile)
                      31.
                      32.
                      33. outPath = str(outfile.absolute())
                      34. print(outPath)
                      35.
                      36.
                      37. #print(__file__)
                      38. me = Path(__file__)
                      39. dir = me.parent
                      40.
                      41.
                      42. os.chdir(str(dir.resolve()))
                      43.
                      44.
                      45. #sample data for testing the model prediction
                      46. test_df = pd.read_csv(dataPath, encoding="utf-8")
                      47.
                      48.
                      49. #Calc Hypotenuse
                      50. test_df["z"] =
                      np.sqrt(np.power(test_df["x"],2) +
                      np.power(test_df["y"],2))
                      51.
                      52.
                      53. test_df.to_csv(path_or_buf=outPath, index=False)
                      54.
                      55.
                      56. print(test_df.to_csv(index=False))
Processing Input:
-
line 46: test_df = pd.read_csv(dataPath, encoding="utf-8")
- This is how our input file is being processed/read into a pandas dataframe, where dataPath is the path to our input file
which is parsed on
- line 17: datafile = Path(sys.argv[1])
- line 18: if (not datafile.is_file()):
- line 19: sys.stderr.write("Input file not found")
- line 20: sys.exit(2)
- line 21:
- line 22: dataPath = str(datafile.resolve())
Processing Output:
- line 53: test_df.to_csv(path_or_buf=outPath, index=False)
- This is how our output file is being generated,
which is parsed on
- line 29: outfile = Path(sys.argv[2])
- line 30: print(outfile)
- line 31:
- line 32:
- line 33: outPath = str(outfile.absolute())
So, looking at 17 and 29, you can see that sys.argv[1] and sys.argv[2] are used for the input and output files respectively. Relative paths are made absolute and data is parsed and processed.
How this script should look at the CLI:
Since there are no switches, and we are simply processing sys.argv[1] and sys.argv[2], you can expect the python script to run as follows
$> python test.py input.json output.json
if you were to run it locally and outside of the container.
How build settings look on inode-ai when setting up the pythagorean model:
Note especially the "Command line arguments" line {input}
{output}
{input} and {output}
are just generic placeholders for the input file and output filenames.
Assume your script runs at the CLI as follows... $> python
test.py input.json output.json
, then {input} and {output} maps
like this...
$> python test.py input_file.dat output_file.dat
{input}
                    {output}
More specifically (just in case the alignment above got screwed up), {input} maps to
input_file.dat and {output} maps to output_file.dat
All your entry script needs to be able to do is accept command line arguments for an input file and output file respectively. You don't need a specific naming scheme or anything like that.
Getting Input/Output recognized when using the inode-ai library.
While using our library function grav.wait_for_requests(your_function), your_function should assume as arguments an input file path and output file path respectively. Your script should then parse that input file, perform whatever logic necessary, and generate an output file referenced by the output file path.
See below for a working example (implementing the pythagorean theorem):
                  1. import numpy as np
                  2. import pandas as pd
                  3. from inode-ai import inode-ai as grav
                  4.
                  5.
                  6. async def doIt(dataPath,
                  outPath):
                  7. test_df = pd.read_csv(dataPath, encoding="utf-8")
                  8. # Calc Hypotenuse
                  9. test_df[0]["z"] = np.sqrt(np.power(test_df[0]["x"], 2) + np.power(test_df[0]["y"], 2))
                  10.
                  11. test_df.to_csv(path_or_buf=outPath, index=False)
                  12.
                  13.
                  14. grav.wait_for_requests(doIt)
Processing Input:
-
line 14: grav.wait_for_requests(doIt)
- This is the entry line to the script. In particular, it's calling wait_for_requests, which takes as an argument a function with two arguments referencing an input file path and output file path.
Input is then parsed as follows...
- Line 6:
async def doIt(dataPath, outPath): - Line 7:
test_df = pd.read_csv(dataPath,
                      encoding="utf-8")
Processing Output:
-
line 14: grav.wait_for_requests(doIt)
- This is the entry line to the script. In particular, it's calling wait_for_requests, which takes as an argument a function with two arguments referencing an input file path and output file path.
Input is then parsed as follows...
- Line 6:
async def doIt(dataPath, outPath): - Line 11:
test_df.to_csv(path_or_buf=outPath,
                      index=False)
How this script should look at the CLI:
Due to the reliance on the inode-ai library for this example, the CLI might look a bit differently. In particular, the command "run" must be supplied.
In particular, it might look like this...
$> python test.py run input.dat output.dat
Don't worry, you need not account for this in your entry script, as we will be supplying the path to input.csv and output.csv for you. All you need to do is code a function that expects an input file path and output file path. See below.
How build settings look on inode-ai when setting up the pythagorean model:
Note that you no longer need to specify that command line input. This is because you're now using a helper method
- line 14:
grav.wait_for_requests(doIt)
which leads to a user defined
- line 6:
async def doIt(dataPath, outPath)
More specifically, grav.wait_for_requests() accepts as an argument, a function which, in turn, accepts as arguments an input file path and output file path respectively. This function can be named whatever, and the arguments can be named whatever you wish as well. The important thing is that it's a function which accepts as arguments an input file path and output file path and the logic of that user defined function should assume such.
Schema Path for CSV style data
Paths for CSV data work the same way as JSON, except they do not have nested objects. Each path refers to a column name (as supplied in the first header line of the file). If the data file does not include a header, each field may be referred to by its index (i.e. /1 /2 etc). If a header occurs more than once in the file, it is considered to be an array, with the left-most filed starting at position 0.
Important to remember!
- Its important to remember that your schema must match the data you supply to
your model. If you provide an input
field that specifies it is of type, but really, your model accepts an array of strings, it
simply will not work.
- Be sure to and verify your schema before building.
Troubleshooting
Q. My model is hanging, what gives?!
- This can be the result of numerous things, but likely, your model is likely incorrect. This can be anything from a spacing problem in a python script, to a dependency problem leading to X not being recognized.
- The best way to resolve this issue is to log into a debian slim-buster container and attempt to build and run your application there (in the container). If you see any exceptions generated in the container CLI as you run your application, try to address those problems (and if necessary correct your dependencies) and re-upload/rebuild.
- You might save yourself a lot of heartache by simply setting up a debian vm and
developing your project (initially)
there. Theret find my input file, what do I do?
- Your script should be expecting an input string denoting a path to an input
file.
- See "Input Output Handling"
Q. My container failed with some weird error message, but it worked fine locally. Whats wrong
- if you develop your application on a MAC/Windows platform and expect your dependencies to be the same on debian, you might be in for a rude awakening. Make sure your model works on linux (debian, preferably)!
- Say if you were to take special care to develop/run your application in the same environment yout work when a job is submitted (via our GUI). Then this is likely due to your build settings. Re-check your build settings and make sure your schema, CLI arguments, etc. are correct.
- Your script should be expecting an input string denoting a path to an input
file.
Build Testing
It’s possible to run tests at build time to ensure that your container is working properly after it’s been built by InodeAI. All you would need to do is alter your requirements.txt file to include paths to both a test input file and aoutput file to verify against. Including such tests will allow you to verify that your build settings are correct.
Each Test object has the following fields:
- RelativeInputPath - A text string path to look at in the archive, relative to the directory location of this configuration file. The path should point to a test data input file that your algorithm will accept and run against at build time.
Overview
In order to submit on-demand jobs, you will need to interact with the job-api.
Note:You must provide your api key prior to making these calls
Note: This only applies to Hosted on-demand models. This documentation has nothing to do with running tests or jobs on a docker container.Note: This only applies to Hosted on-demand models.
API
Submit a Job
Request
Perform this call in order to post the job.GET: https://www.inode-ai.com/my-account/api/job
Request Body
headers = {'x-api-key':API_KEY, 'Accept':'application/json'}
Function to post a job
def postJob(input_file): API_CREATE_JOB_URL=https://www.inode-ai.com/my-account/api/job' file=open(f'{input_file}','rb') response=requests.post(url=API_CREATE_JOB_URL,headers=headers,files={'file':file}) response=response.json() if response.get('error')==False: if response.get('data'): jobid=response.get('data').get('jobid') return str(jobid) elif response.get('error')==True: raise Exception("Error: " + response.get('msg'))
Getting a particular job's details
Request
Perform this call in order to fetch the details pertaining to a particular job. As one can see, the jobId must be supplied.GET: https://www.inode-ai.com/my-account/api/jobresult/{jobid}
Request Body
headers = {'x-api-key':API_KEY, 'Accept':'application/json'}
Function to get result
def downloadResult(jobid,output_file): API_GET_JOB_RESULT_URL=API_URI+'/my-account/api/jobresult/'+jobid response=requests.get(url=API_GET_JOB_RESULT_URL,headers=headers) response=response.json() if response.get('error')==False: data=response.get('data') open ('input.csv','wb').write(base64.b64decode(data['input_data'])) if data.get('job_status')=='Failed': open ('log.txt','w').write(data['log_data'].encode('utf-8')) elif data.get('job_status')=='Complete': open (f'{output_file}','wb').write(base64.b64decode(data['result_data'])) elif response.get('error')==True: raise Exception("Error: " + response.get('msg'))
Purchasing an On-Demand Model
Step 1: The model in the catalog you wish to purchase
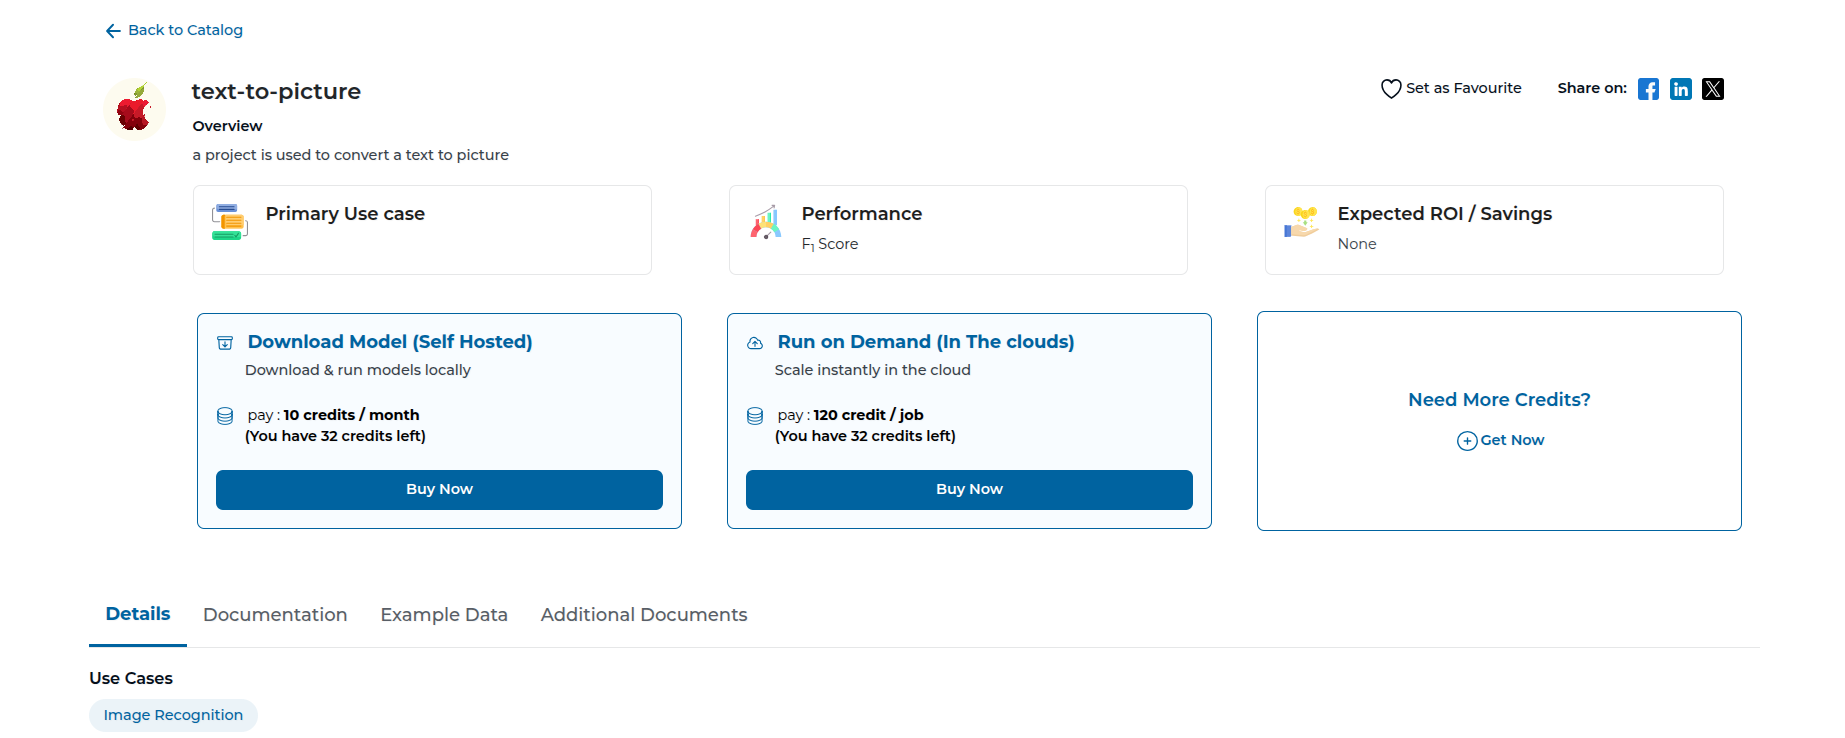
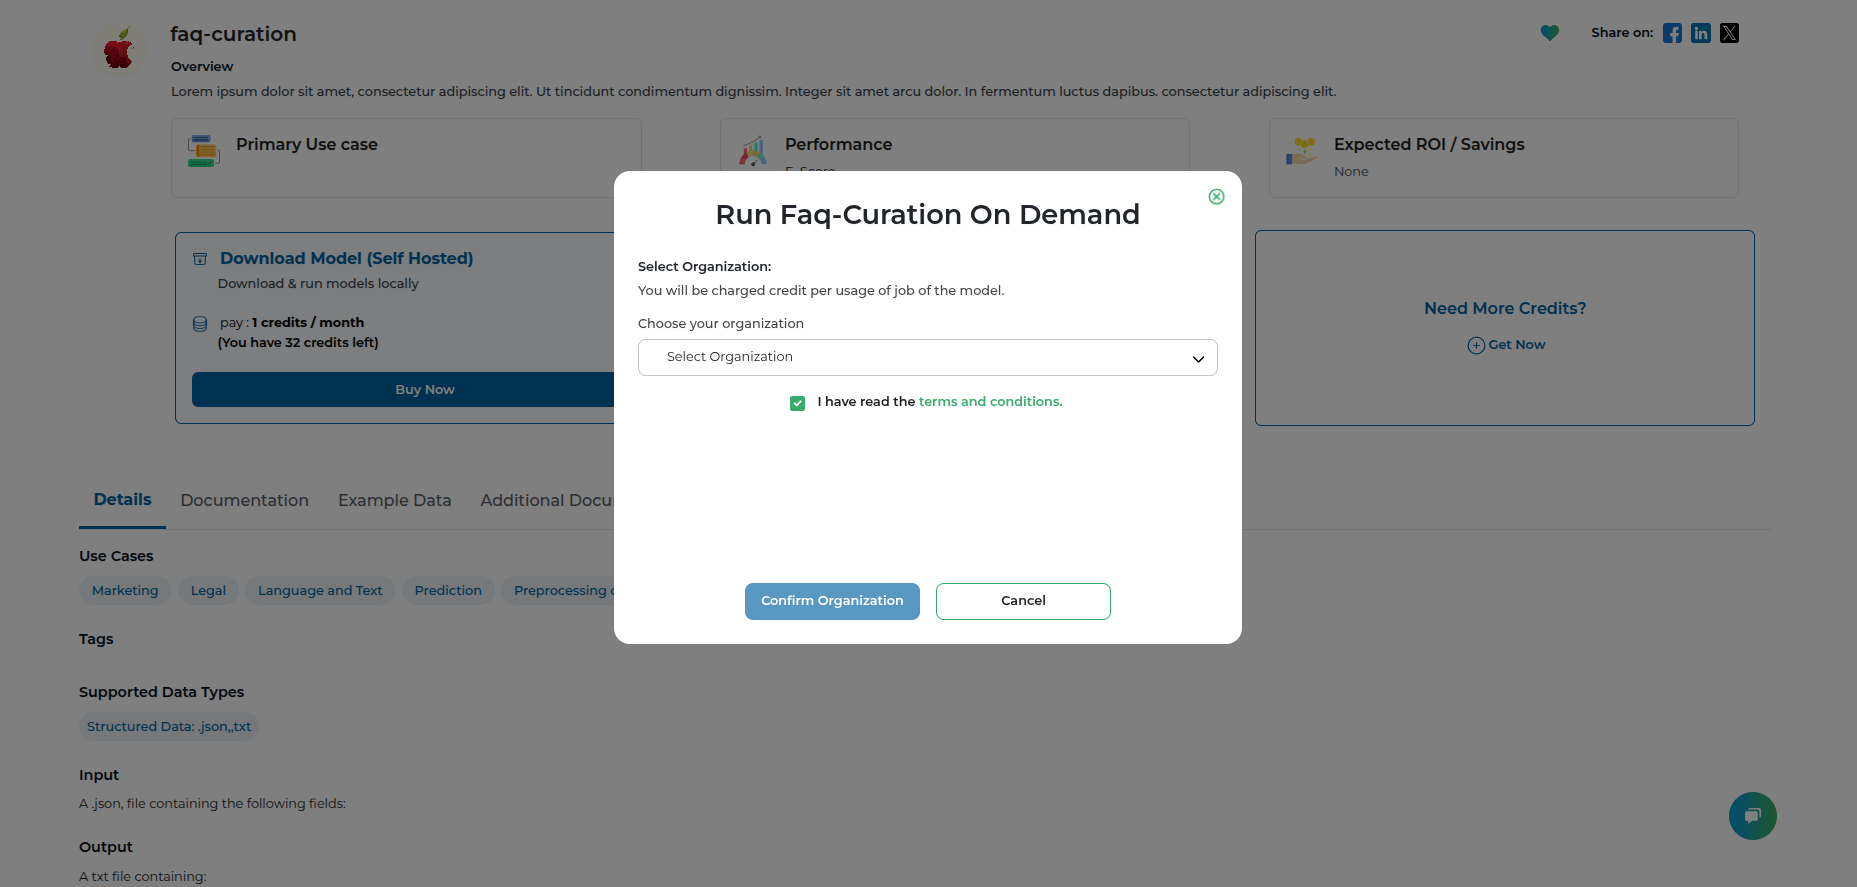
Step 2: Select the organization you want to run the on-demand model
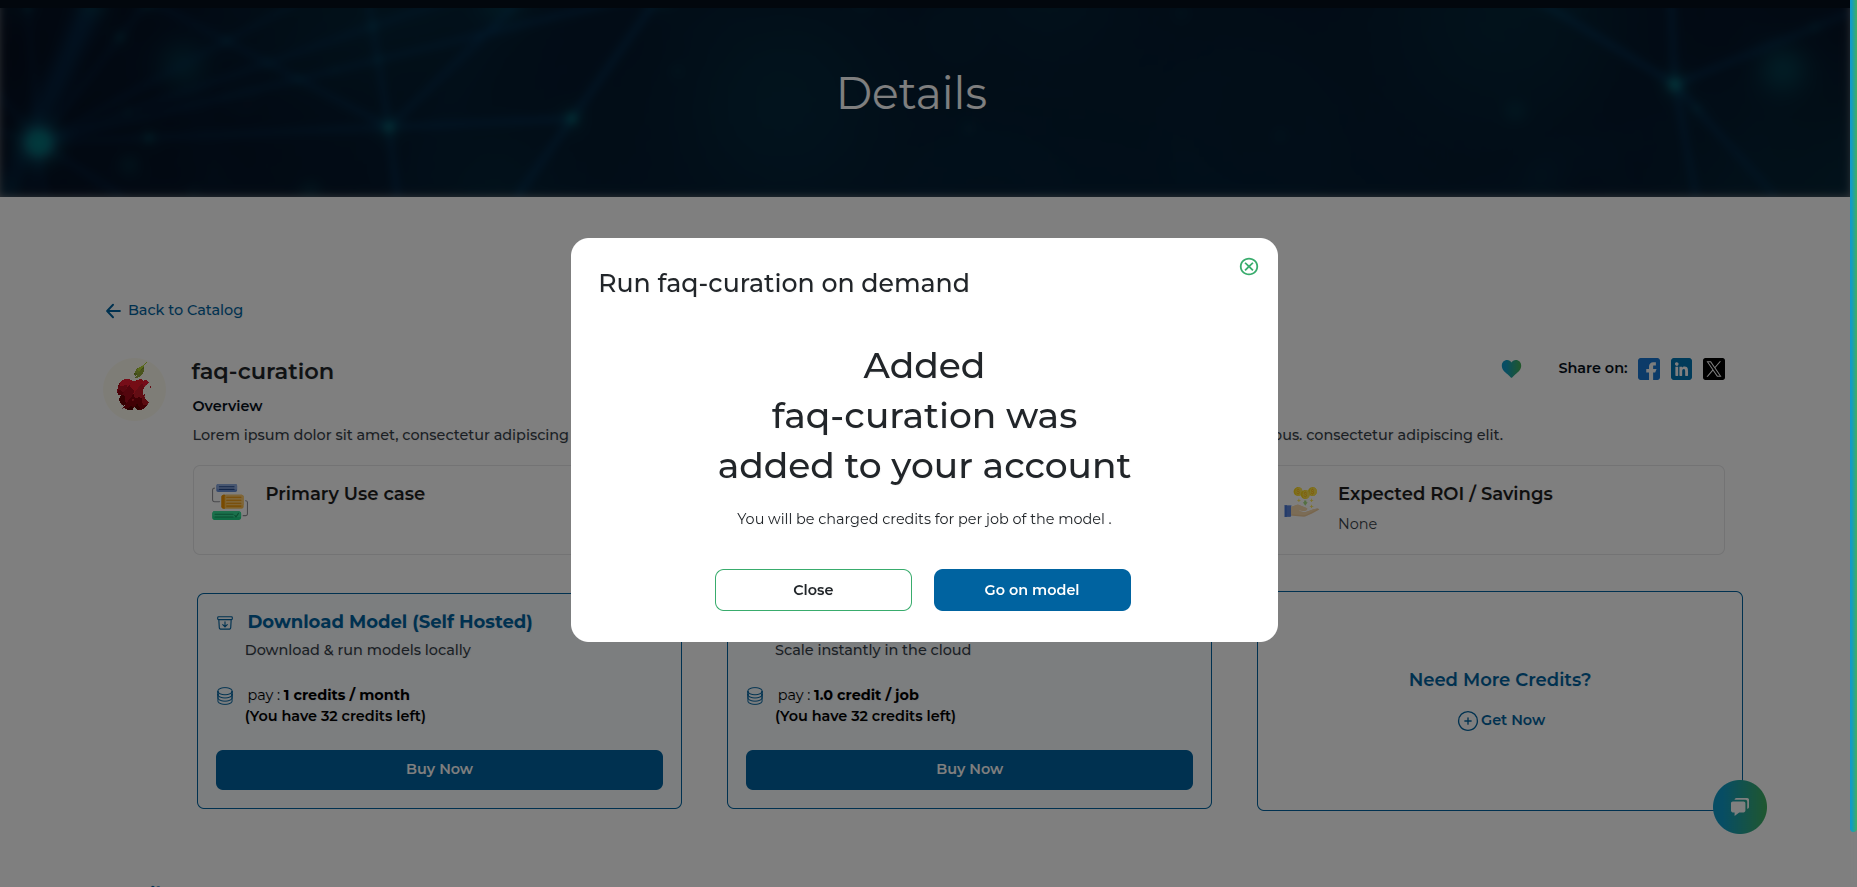
Step 3: Go to the purchased model dashboard
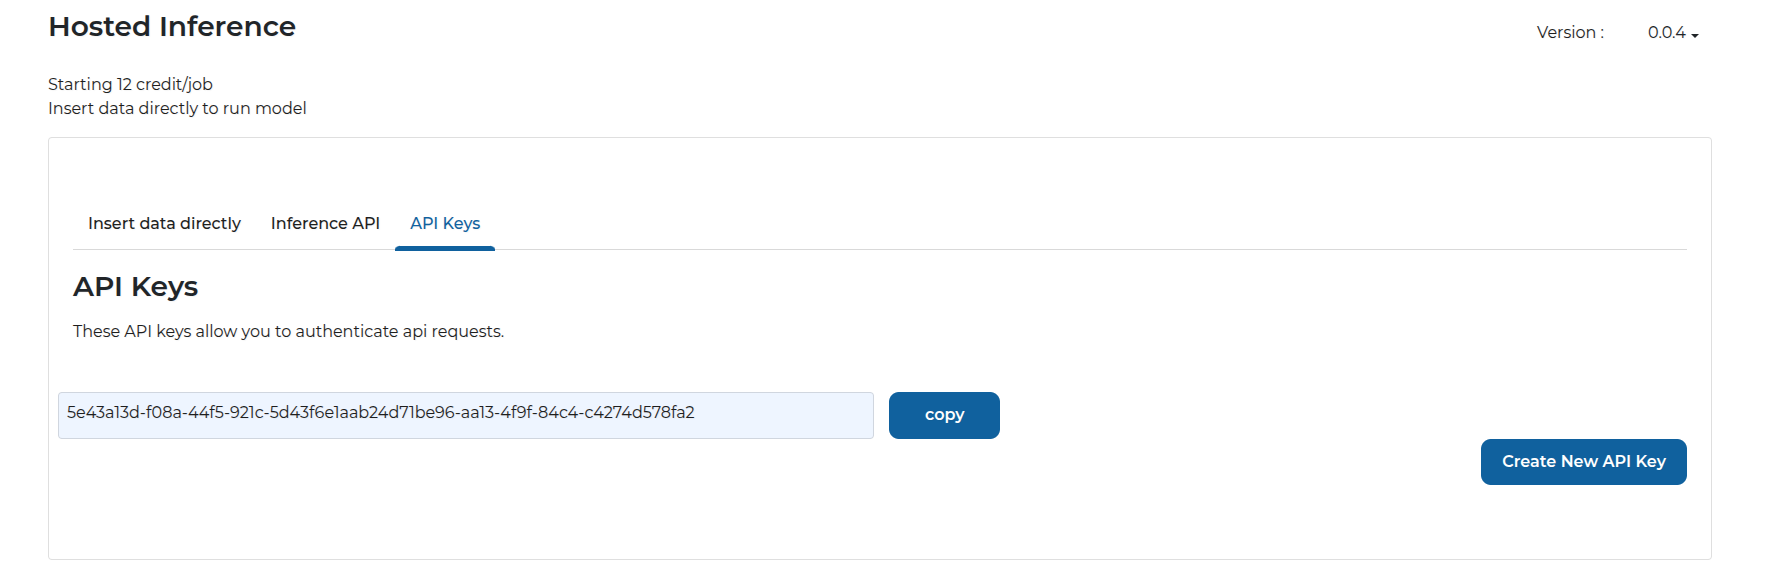
Step 4: Notice that you have to supply billing details and generate an API key
Step 5: Fill out your payment details
License Keys
Note: The following does not apply to enterprise version of the marketplace.
License keys are required to access INode ai containers.
Developer License Keys
During development, you might need a "developer license key" in order to test your model. You can easily download once your project has finished building.

Creating a New Project
Project Type
There are a few different types of projects that can be created to share on the InodeAi
1. Production Code
2. R Environment Code
Production Code
This project is meant to host code in a production environment. You upload your code/model as an archive, which is then packaged into a distributable container with a standard API.
Creating Your Model
Language Options include Python and R.
Preparing your model for upload.
Models should be archived into a zip format (gzip, etc) archive. Your source code, data files, and anything else needed to distribute your model should be included in the zip file.
Command line execution
Your script will be run from the command line. It must not rely on any user interaction. Your script should accept an input file path, and an output file path.
Model Documentation
General Model Overview
Explain about model overview like models has converting an .png image to .jpeg image
Business & Executive
Expected ROI / Savings
The primary benefits of the model are to reduce the need for manual reading and comprehension of documents.
A domain experienced person can be expected to read and answer questions at approximately 200 words a minute. Assuming an employee cost of $300 per hour, this is $5 per minute, and 40 words per dollar per minute.
A cautious estimate for machine question answering is 200,000 words per minute, with an operating cost of $0.1 per minute, and 2 million words per dollar per minute.
Assuming 5% of documents require human intervention this is a cost improvement.
In addition, human errors are far more inconsistent than model errors. This means model errors can be compensated for, or used to inform further model training.
Recommended Use Cases
Title:
Searching a document repository for invoices from a specific supplier.
Description:
The model can be asked to identify documents which have a specified supplier name located in the expected locations in the document, such as document headers, address fields and sign-off signatures.
Business Fit
The model can be used to aid financial reconciliation processes by ensuring an automated search for invoice documents from a specific supplier match manual processes.
The model can be used to aid an audit of supplier spend by supporting the search of financial documents.
The model can be used to automatically identify those customers using a customer service chatbot who are particularly unhappy, frustrated or in a vulnerable state.
Anti Patterns
The model is not intended to take free-form queries directly from end-users, such as the public, as performance is diluted in this scenario. The range of queries should be constrained to be domain-specific, and their performance should be tested before use, and regularly during.
This customer sentiment analysis model should not be used to automate responses to customers identified as unhappy or in a vulnerable state. The alert should be escalated for a person.
Implementation & Governance
Model Architecture image example

Description
NOTE: All given text are just example
The architecture overview presents the key elements of the model and data pipeline. There are two loosely-coupled elements - a question answering pre-trained model, and a preceding text extraction and optimisation engine.
The pretrained question answering model takes as input, a query document in the form of plain text, and a natural language query. Its output is the answer to the natural language question, together with a confidence score for that answer..
The query document text is prepared from source documents which are in PDF form. These PDFs are converted to images, and an OCR module converts these bitmaps to text. Optional text optimisation can be enabled to, for example, correct common misspellings or apply an organisational taxonomy.
Currently any text within source PDFs is not extracted.
Input Data
The architecture overview presents the key elements of the model and data pipeline. There are two loosely-coupled elements - a question answering pre-trained model, and a preceding text extraction and optimisation engine.
| Name | Format | Description |
|---|---|---|
| Natural Language Question | String 3-20 words. | This is the natural question issued to the model. |
| Age | Integer 18-130 | The age of the customer. Should not be below 18. |
Output Data
| Name | Format | Interpretation |
|---|---|---|
| Document IDs | String | The information provided about the customer has been evaluated by the model as sufficient to indicate a good loan customer when compared to the evidence base of the training data. |
Explainability of Outputs
The decision tree supporting the model’s output can be extracted. Model outputs are readily interpretable in terms of the customer information provided as input.
Typically the customer’s age and average income are the most significant factors in a loan decision.
Performance
70%
The model achieves a correct identification rate of 90% when trained on the MNIST training data set using 20 training epochs and tested against the MNIST test dataset.
Hardware Requirements
CPU:
2 Cores
RAM:
T16 GB
Runtime :
A few minutes
Risk & Compliance
Privacy Risks
The model is a general question answering system which returns information from a training database of financial documents from your organisation which can contain personal information, such as names, telephone numbers and addresses.
It is possible to apply, an albeit imperfect, filter to remove records containing personal information from this dataset, but this has an overall negative effect on the usefulness of the training data.
Risk to Individuals
To control the risk of unauthorised access to personal information being returned by queries, three measures are recommended: (1) to constrain the queries to a known set which don’t specifically ask for personal information, and (2) to limit the individuals and systems which can access the returned information, and (3) to only use relevant and non-personal results in onward processing.
Uploading an R Project
Before uploading a project to gravityAi it need to be prepared using the following steps:
1. Project dependencies
Inode AI depends on renv to load prerequisite packages properly. This ensures that the packages used by your script are loaded properly into the container. Without this step, there would be no guarantee that your code would have the prerequisite packages installed.
r$> install.packages(‘renv’)
Initialize renv. Make sure you are running R from your root project directory.
r$> renv::init()
This will create a subdirectory called ‘renv’ in your project folder that contains a few files. It will also create a renv.lock file which contains a list of package dependencies for your project.
Restart R, and verify that the dependencies are correct.
If you change any packages, make sure you update it.
2. Zip and upload the project
InodeAi supports zip-style compression format zip. Choose a format and then compress your project directory. You may exclude the following directory created by renv (excluding it will make your compressed file much smaller):
myproject/renv/library
Be sure to include any data files or other files that your project needs in order to function properly
When editing your build settings, you will need to select the packages.txt file, and the R script file that is the main entrypoint for your code.